Whether you love or hate using PowerPoint, knowing about and understanding its features will save you time and reduce frustration. We work with PowerPoint daily and while there are many features we wish PowerPoint had, there are some great ones you may not have realised existed already!
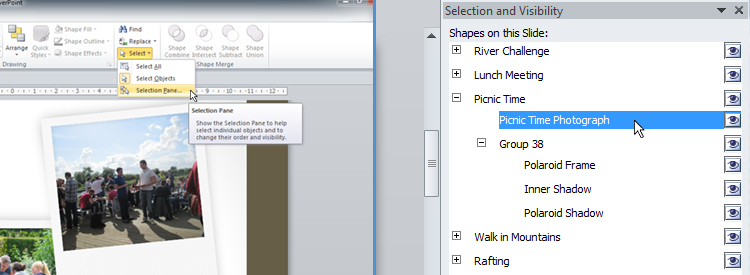
The Selection and Visibility pane – Having trouble selecting objects on complicated slides – especially ones with a lot of layers? The selection and visibility panel is the solution! Somewhat hidden, the pane can be found in the Home tab > Editing > Select > Selection Pane. Not only does this panel allow you to select any object or image on your slide to move or animate etc., it allows you to rename them, re-order them (to bring them nearer the front or back) and also hide/unhide objects which are in the way, saving you time when changing your content.
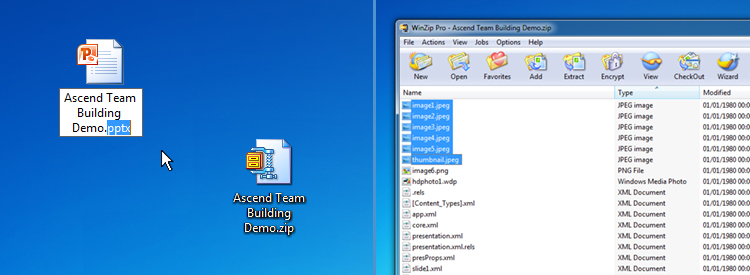
PowerPoint files work as a Zip format – We only found this out recently, but changing the PowerPoint file extension to a Zip format enables you to access all of the original photos and vector images from a PowerPoint presentation! This is done outside of PowerPoint by right clicking your file on the desktop and chancing the file extension so that ‘.pptx’ becomes ‘.zip’. This is a huge time-saver if you ever need to extract content from a PowerPoint file – much quicker than right clicking each item and saving them out as a picture!
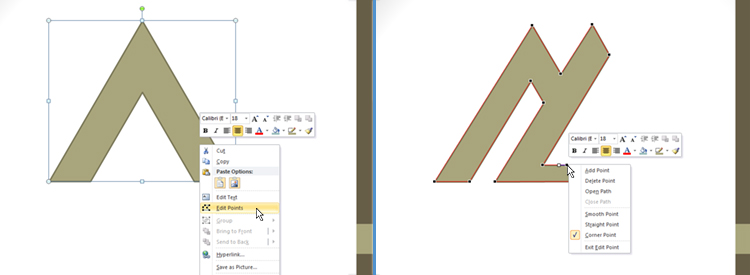
Edit Points – You don’t have to use the standard shapes in PowerPoint for your graphics. By editing their points you can create any shape you want. Access this feature by right clicking a shape you have added to your slide and select Edit Points. You can now drag the points of the shape to any position you like. You can also move the blue handles off the points to affect how the curves or edges react. Lastly, if you need to add or delete points, right click on the shape in the Edit Points mode and you get a new menu to allow you to do this.
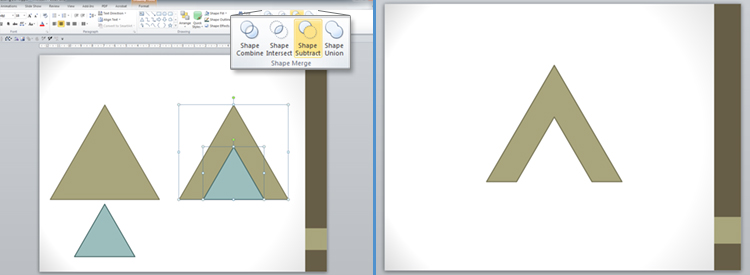
Shape Combine, Intersect, Subtract & Union – These four shape tools allow you to alter shapes in PowerPoint to an even higher degree than the Edit Points tool. If for example you wanted to create a triangle with a smaller triangular hole cut out from its centre the edit points tool would be no use. However, if you created a large and small triangle and placed them one on top of the other, selected them both and used the Shape Combine tool – you would have exactly that! In PowerPoint 2010 this feature is very much hidden. You will need to customise your toolbars and add these tools to it (there are many tutorials available on how to customise the toolbars). If you are planning on investing in the new PowerPoint 2013, this feature is already on your toolbars and available to use!
Video editing – A new feature included with PowerPoint 2010 was video editing. Once you have imported your video, you can resize, crop and trim it down to a shorter length. This can be exported back out of PowerPoint as a brand new video when you’re finished too. To export your slideshow as a video, go to the File tab > Save & Send > Create a Video. If you are unfamiliar with video editing suites or even basic ones such as Windows Movie Maker, this can be very handy for quick video editing and no other software is required.

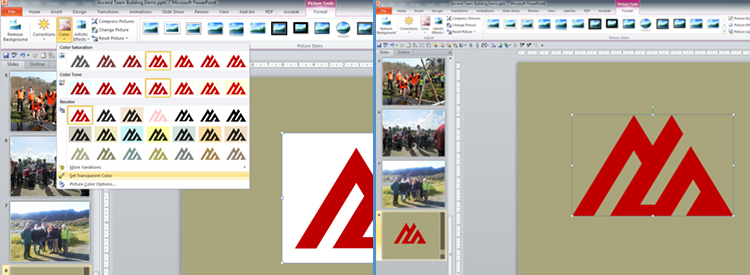
Remove the Background of an Image – Although this feature isn’t perfect, it’s a great way to cut out a person or object from an image with a flat colour background. To access the feature, select your image and go to the Format tab > Colour > Set Transparent Colour (please note, this is the same as ‘Color’ but spelt correctly).Now click the colour on your image that you want to remove. This is most commonly used to remove white backgrounds from images.
Change Smart Art to Shapes – The Smart Art feature in PowerPoint found in the Insert tab, can be great for creating infographics or diagrams, but moving individual components or animating them can often become rather troublesome. By selecting the Smart Art object and ungrouping it, it is split into separate components which can be moved or animated individually. Be warned though, once Smart Art is ungrouped, you will not be able to edit the shapes or objects using the Smart Art tool.

Create photo albums – Using your own photos to create a slideshow in PowerPoint is a snap! PowerPoint 2010 introduced a new Photo Album feature found in the Insert tab > Photo Album. This feature allows you to import a set of photos or images onto separate slides and lets you choose the frame style, titles and captions for them. After adding your choice of slide transitions, you will have created a slideshow in literally minutes! To finish off, PowerPoint allows you to export your slideshow as a video, great for showing online in YouTube or Vimeo – see Video Editing.

We hope you have learnt something new from our list and if there are any rare or hidden features you think we may have missed, get in touch and let us know!